Rancilio Silvia Mega-Mod part 4 Brew and Steam Control

Index of Silvia Mega-Mod posts:
Introduction | Disassembly | Pressure Gauge | Brew+Steam Control | Brew Timer | Pre-Infusion
Water Level | Light | Boiler Insulation | Grouphead Shower | Drip Tray | Pump Drain
Power Timer | Insulated Steam Wand | Acknowledgments
Buy Silvia Mega-Mod eBook
Avi's Silvia Mega-Mod
My way to a better coffee...
DISCLAIMER - Important!
The following drawings show the overall schematic layout of my Mega-Mod that combines all mods that deal with electric/electronics modifications, and a drawing focusing on the Brew and Steam control.
For specific details of each mod please see its relevant post.

Avi’s Silvia Full Mega-Mod wiring drawing
Avi’s Silvia Full Mega-Mod wiring drawing
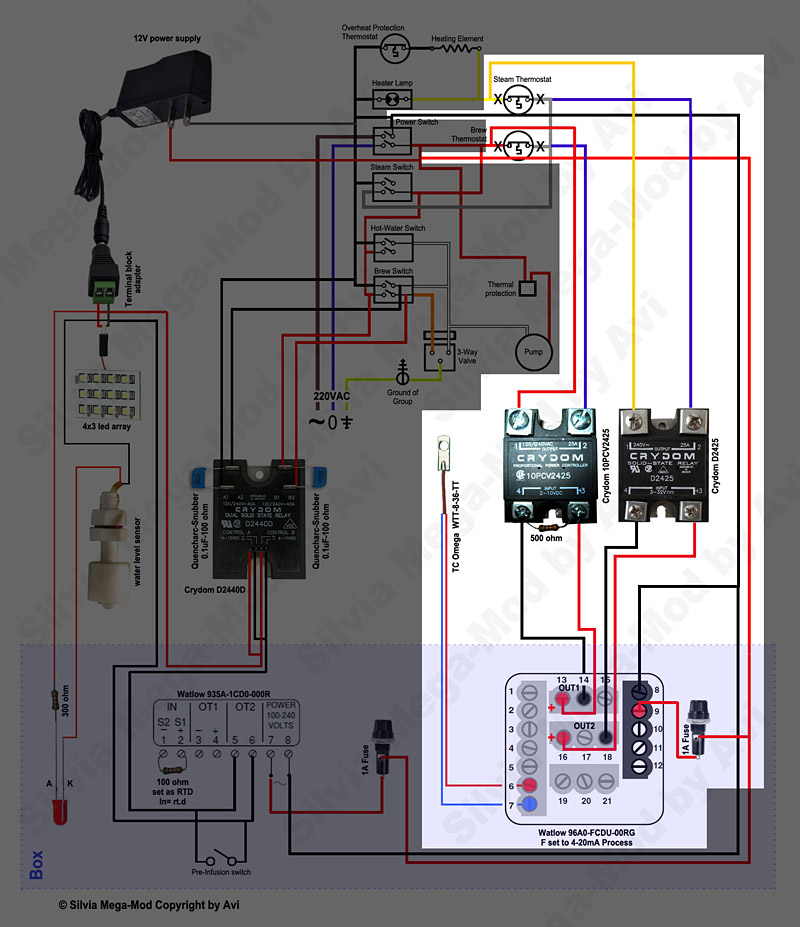
Avi’s Silvia Mega-Mod Brew and Steam control schematic
Avi’s Silvia Mega-Mod Brew and Steam control wiring drawing
There are few ways to do this mod, each present different approach and involves different components and wiring.
For me, it was important to separately control both brew and steam set-point (=the target temperature for the boiler to reach) and to see the current temperature while in the process (=dual display).
One way to do this is with 2 separate controllers, each with its own set-point, or a dual set-point controller.
I have found that dual set-point controllers are very expansive and only a few exist, so I started searching and hunting for used ones. This hunt went for few months but it was worth the trouble and the waiting since I eventually got a Watlow 96A0-FCDU-00RG controller for ~$35.
This controller that I got is a Watlow 96 series. See its specs here and manual here. See also my Watlow fix post.
The controller has 4 possible outputs and each can be one of few, so there are many models out there and it is advised to know exactly what you are buying.
The basic options for a Watlow 96 output are:
Type C – can drive DC-AC SSR
Type K – can drive AC-AC SSR
Type F – can drive proportional DC-AC SSR (best option but requires costly SSR)
Type D – is a mechanical relay that can take 2A@250VAC. (100K operations lifetime)
Since Silvia’s heat element is 5A and operates many times, you can’t connect this relay directly to the heating element and thus it is not a preferred output. It is possible however to connect this output to an SSR but still, the triggering component remains a mechanical relay. My advice is to avoid this option for the brew function.
This is a proportional output that allows the controller to act like a dimmer and trigger the heating element not only with on (100%) or off (0 %) but rather with any value in between as well.
It allows using more sophisticated control algorithm, saves energy and getting better and faster results.
Type F output requires a proportional SSR in order to use its proportional ability and this SSR might be expensive.
As I wrote earlier, if you are a hunter and wait enough time, you’ll find what you want. I got my Crydom 10PCV2425 proportional SSR for less than $20, so be patient.
Watch this short YouTube video of testing a proportional SSR.
It triggers a bulb and shows very well the ‘dimmer like’ action when raising / lowering the SSR input voltage.
 Tip: Type F is range selectable and can be set as 0-20mA, 4-20mA , 0-5VDC, 1-5VDC, 0-10VDC.
I set this output to 4-20mA and added 500 Ohm 1/4W resistor in parallel to the input contacts of the SSR.
This way I got 2-10V to trigger the SSR. Crydom 10PCV2425 input is 2-10VDC so I got full range match this way.
I obviously chose to use the more sophisticated output F-type for the brew channel which works most of the time while Silvia is ON and needs more control.
I used the C-type for the steam channel which works only for a limited time and in that time needs full power to produce and keep steam.
This controller has also a communication channel, but at this point, I’m not using it. (maybe I’ll use it later on for computer control and data gathering)
Tip: Please note that the design of this mod may change according to the specific controller model you get. The output type determines the kind of components that trigger the heating element.
My scheme is based on Watlow 96A0-FCDU-00RG.
Important: I have installed both the brew and the steam SSRs behind the front panel.
This location might create a possible electric shock risk since SSR contacts are so low that while cleaning this area a possible contact might happen. With this location, it is advised to add a protective lower wall made of non-conductive material.

I have also added some thermal compound under the thermocouple to improve heat transfer.
Connecting the sensor this way is the easiest way to do since it does not involves drilling and assembly of an internal sensor.
It might be less accurate, but more reasonable for this project.
This is a compromise method to measure the external temperature of the boiler rather than measuring the inside actual water/steam temperature.
Because it is done externally, we compensate the temperatures that we refer to and set the controller to higher values than the optimal water/steam temperatures that we want to reach.
I made the measurements by connecting the controller to the TC that was already attached to the boiler.
Measurements were taken after heating Silvia for 45 minutes and then I made several cycles of brewing and steaming readings. Average reading was calculated as results were not consistent and had small differences from cycle to cycle.
Temperatures readings of my Silvia were:
Heating:
Heating element lamp turns ON @ 94.0°C (201.2°F).
Heating element lamp turns OFF @ 109.4°C (228.9°F).
After it turns off, overshoot temperature reached 121.9°C (251.4°F) before it starts dropping.
Steaming:
Heating element lamp turns ON @ 130.6°C (267°F). |
Heating element lamp turns OFF @ 141.2°C (286.1°F).
After it turns off, overshoot temperature reached 147.5°C (297.5°F) before it starts dropping.
Based on the above readings, I started by setting the PID to:
Brew setpoint – 101.7°C (215.0°F) = mean of brew thermostat.
Steam setpoint – 140°C (284.0°F) = a temperature which is a little below original off point.
The only open question left now was to know whether the brew exit water temperature is correct with the above setup. Few cycles of brewing while measuring the exit water temperature right after boiler reached the setpoint of 101.7°C gave the answer. In my Silvia, it was 86°C (186.8°F) which is too low.
Based on the above, I adjusted the brew setpoint to 104.0°C (219.2°F) to reach exit water temperature of 88°C (190.4°F) which is the recommended exit water temperature by the Italian Espresso National Institute.
My measurements were probably not as accurate as using Scace Thermofilter, but still good enough for my project.

Avi’s Silvia Mega-Mod Brew and Steam control front view
Brew and Steam SSR’s front view

Avi’s Silvia Mega-Mod Brew and Steam control components
Front view of assembled components

Avi’s Silvia Mega-Mod Brew and Steam control switches connections
Using piggy spade crimp for switches

Avi’s Silvia Mega-Mod Brew and Steam control wires
Top view of wires and markings
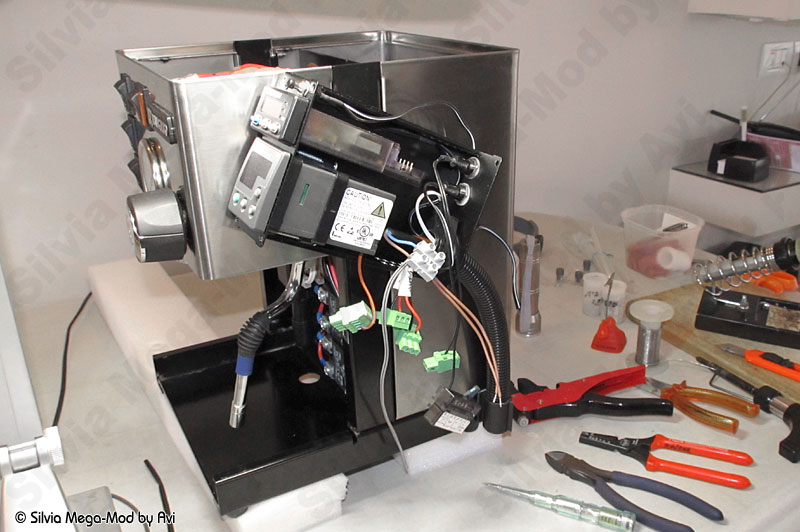
Avi’s Silvia Mega-Mod Brew and Steam control in work
Controller wiring in work

Avi’s Silvia Mega-Mod Brew and Steam control ready
Assembled mod and controller before closing
Tip: When you decide where to place the SSR’s, select places that has less chance of seeing water.Prefer higher locations and far from water pipe lines.
Tip: For the external box you can search for fancy stainless box or order one to your measurements and design.
I used a standard Aluminum project box, black anodized with dimensions of ~106x55x152mm to hold the 2 controllers
that I used.
Tip: Design your box according to actual components dimensions and not only to its datasheets.
In my case, the design was very strict due to the small box that I used.
Tip: Check your components. This mod is based on using 220VAC mains and components. If your mains is 110VAC, you need to acquire suitable controllers, SSRs, etc. that are designed to work under 110VAC.
Tip: Since heat develops around Silvia’s boiler and new wires are added to serve the modding, it is advised to use high temperature resistance wires such as wires with Silicone sleeve. Racing car industry uses those wires a lot.
Tip: Look for used components in electronic shops, internet, auctions sites etc. you’ll end up the project with a reasonable cost as I did though it will take longer to acquire. Some parts like controllers and SSRs can be very costly as new.
Tip: If you got a fault or wrong model 96 controller, don’t be desperate.
It might be easily fixed. See my Watlow 96/97 repair page. This page can save you a lot of $$$.

Index of Silvia Mega-Mod posts:
Introduction | Disassembly | Pressure Gauge | Brew+Steam Control | Brew Timer | Pre-Infusion
Water Level | Light | Boiler Insulation | Grouphead Shower | Drip Tray | Pump Drain
Power Timer | Insulated Steam Wand | Acknowledgments
Buy Silvia Mega-Mod eBook
Comments, remarks and updates are welcome.
Some will be published, with hidden sender's details.
Did you find this article helpful?
Did it save you time and trouble?
If yes, please consider donating some $$$ to help me cover the hosting cost involved. Thanks
To make a donation, please click the following PayPal button:

Copyright © Schneor Design. All rights reserved. Do not copy without written consent from the author.
0 Comments