iRobot Roomba 5xx 6xx 7xx Red CHM mod

Roomba Red CHM mod
How did I modify 5xx CHM with bearings
and/or found that the plastic housing had started to deform due to massive friction.
With this modification dust and hair entering to the gearbox will be blocked.
Worn to the gearbox wheels, wheel holes and to brush hubs will be reduced dramatically as ball bearings will replace the plastic to plastic friction.
Doing this modification on time (when no serious damage was done to the plastic holes) will ‘save’ and extend Roomba CHM life and will add many hours of smooth and quieter work.
 Note:
Note:This page describes Roomba 560 but it is the same for all 5xx 6xx 7xx series models that uses Green / Red / Gray CHM though procedure might be slightly different.
For the Gray CHM mod details instructions go to this page.
DISCLAIMER - Important!
- Phillips head screwdriver
- Old toothbrush or some other small cleaning brush
- Lithium grease
- Vacuum cleaner (to be use it in each step where you find dust and hair buildup. Be careful not to vacuum small parts as well.)
- Electric screwdriver or drill
(This will be used as a kind of lathe that holds the gear wheel in order to contract its diameter.) - Set of files, straight and round.
- Screw and nuts 4-40 or M3 to retain the small gear wheel to the drill.
- Step drill bits
or any other tool that can help expand the housing holes diameter such as grinding stone, awl or a file. - Swivel burrs removal tool.
(This is a great tool to help in expanding housing holes.) - Vise grips or a bit handle
(This is to hold the drill bit etc. It is advised to expand the holes by hand and not with an electric drill to gain precise and more controlled process.) - 3 sealed ball bearings with the following dimensions:
(in x out x thick, Metric system)
– 6x10x3 mm (for motor gear)
– 10x15x4 mm (for small beater brush gear)
– 15x21x4 mm (for large bristle brush gear)
To save you time, I have prepared for you a set of the 3 needed bearings that you can purchase right now. Click the following Buy Now banner to review the set and purchase.
 Note: since most of the screws are screwed to plastic bosses, it is advised to use hand screwdriver for fine torque control.
Remove the screw from the rotating side brush and gently pull it out.


Take out the dust bin.


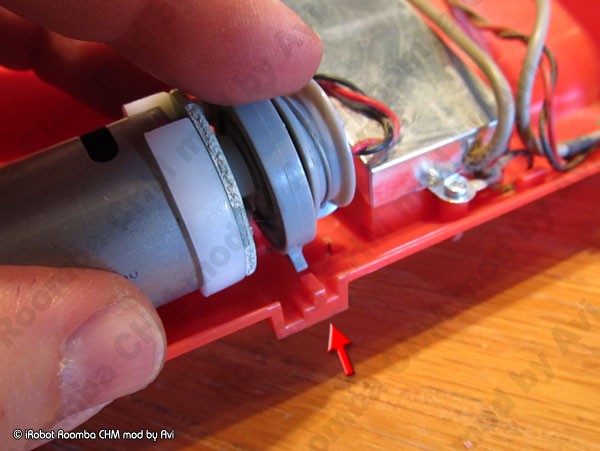
Arrow points to the gearbox side


The gap between the gear wheel cylinder to the plastic housing is seen clearly.
This is the area which this mod is dealing with.

Take off the small round sticker that keeps the motor tension cable.

so the head and cable will go under the slot / inside the module case.


If cover does not get off easily, use a small screwdriver to help separate it.


First unscrew the 2x screws of the plastic bracket that holds the motor to the case.

Pay attention to the hex shape motor shaft which meets with the motor gear wheel.


Modified diameter should meet the inner diameter of the relative bearing.
Mating should be tight. All gear wheels cylinder mating diameter are contracted.
First image shows the 3 gear wheels to be modified.
Second image shows the motor gear wheel which is held with a 4-40 screw and nut in order to attach it to an electric screwdriver chuck jaws. If possible, prefer using table drill or a lathe for perfect centering and alignment.

This is not the best method to use as it is very difficult to get perfect centering.
Use a table drill if you can or a lathe for much better results.
Pay close attention not to file too much !
Check fitting to the bearing often till you reach needed diameter.
Don’t file the gear, just its mating cylinder diameter !Make sure that file’s flat surface is pointing towards the gear.
- Motor wheel cylinder size fits bearing inner diameter of 6.0mm. Stop modifying at 6.3mm
- Beater wheel cylinder size fits bearing inner diameter of 10.0mm. Stop modifying at 10.3mm
- Bristle wheel cylinder size fits bearing inner diameter of 15.0mm. Stop modifying at 15.3mm
 Pay close attention not to file too much !
Check fitting to the bearing often till you reach needed diameter.
Don’t file the gear wheel, just its mating diameter!
Make sure that file’s flat surface is pointing towards the gear.


Mating should be tight. All mating holes diameters are expanded. Check fitting to the bearing often till you reach needed diameter.
- Hole size for motor wheel fits bearing outer diameter of 10.0mm. Stop modifying at 9.7mm
- Hole size for beater wheel fits bearing outer diameter of 15.0mm. Stop modifying at 14.7mm
- Hole size for bristle wheel fits bearing outer diameter of 21.0mm. Stop modifying at 20.7mm

Here you can see the motor bearing with the gear wheel installed.
If using a flanged bearing, the flange should be on the gearbox side.

Use Epoxy glue to fill the gap but make sure the bearing is centered to the hole.
Tip: To prevent gluing the inner bearing ring, mask the bearing prior of applying the glue.
Lubricate the gear wheels using Lithium grease.
Assemble the gearbox cover with its 6 screws and make sure it attaches without gaps
Pay attention to the hex mating of the shaft to the gear wheel when you slide in the motor.
Pay attention to the plastic notch that needs to fit its recess in the case.

Connect + to the Red motor wire and – to the Black motor wire.
At 16VDC, current should be less than 0.5A
If you test it without outer frame, hold the tension wire to allow it to work.

Return the tension wire round head to its place. Screw 3x case screws and 2x PCB screws.


If you have completed the assembly and left without any screw,
hit the Clean button and check if your Roomba is working…
D. Voila – you now have a working iRobot Roomba with modded Red CHM gearbox.
Have fun and enjoy your Roomba, Avi 
Buy Now the bearing set and please consider to donate.
Did you find this article helpful?
Did it save you time and trouble?
If yes, please consider donating some $$$ to help me cover the hosting cost involved. Thanks
To make a donation, please click the following PayPal button:

Comments, remarks and updates are welcome.
Some will be published, with hidden sender's details.


iRobot Roomba DIY Guides by Avi
9-beep fix | power-supply conversion | speaker fix
5xx-7xx CHM cleaning | 8xx-9xx CHM cleaning
Red CHM mod | Gray CHM mod | battery rebuild
Copyright © Schneor Design. All rights reserved. Do not copy without written consent from the author.
Nice work! Seems like a wonderful improvement. Sadly, I just purchased (i.e., invested in) a fresh set of plastic gears already. Perhaps after these wear down I will revisit the situation.
Thanks for your comments. This mod deals with the wear of the gearbox holes. You better check this often before it is damaged. Bearings will prevent this from happening.