
Repair, fix and maintain Grohe flush system

Grohe cistern repair
Fix and maintain Grohe toilet flush system
Grohe dual flush / concealed cistern systems are worldwide known for their quality and reliability. Grohe systems are maintenance free and works for long time without any service.
 Tip: In many countries Grohe warranty is valid for 5-10 years.
You better first check if your warranty is valid and use it prior of following this guide.
After several years of using Grohe system, especially in a high calc level of water (=hard water, = water with high mineral content) and due to material aging, some de-calc, cleaning, maintenance and possibly gasket replacement might be required.
Grohe concealed cistern design is sophisticated and was made so tight that some guidance in needed on how to take it apart in order to perform a cleaning, repair and maintenance process.
When I searched for information on how to repair or take it apart, I have found very little information so I have decided to create my own guide to help you out in the process of taking apart this system. Enjoy it.
DISCLAIMER – Important!
 Please note:
* This guide shows the Grohe GD2 system, cat. # 38642 000 but it might also help with other models as well.
** In this guide the float valve location is on the left side. Since Grohe system was designed symmetrically, it can be located on left or right depends on your water supply installation.
The process of repairing / maintaining Grohe flush system involves:
* Don’t worry, it is easy to gain access to Grohe cistern parts. There is no need to break tiles or wall to do so.
Accessing the system is done through the access panel which is found under the actuation panel.
a: Disassemble according to the following guide.
b: Clean parts from calc buildup, dirt, sand / small stones etc. Tip: You can gently brush the parts under running water.
To get into hidden places, best and cheap way is to soak parts in a Citric acid solution. (use 1 full teaspoon for every liter of water). Citric acid powder can be purchased in every grocery store. Let it soak for a few hours to remove all calc. Tip: When done cleaning and prior to assembling, I advise to test moving parts and make sure it moves freely.
c: Replace any required / fault part.
d: Assemble all parts in reverse order to the disassembly steps.
A. Pneumatic actuation plate
B. Water filling float valve
This sub-assembly consists of 2 main parts and additional parts that needs cleaning.
C. Stabilizing bracket (frame)
D. Pneumatic discharge valve (drop-valve)
This sub-assembly consists of 3 main parts and additional parts that needs cleaning.
Its lower part (the rod) holds the silicone seal that opens the water flow of the flush.

Grohe GD2 assembled parts outside the container
Grohe GD2 main parts
* Image shows assembled parts outside the container
Note: Clicking on each image will open a bigger image.
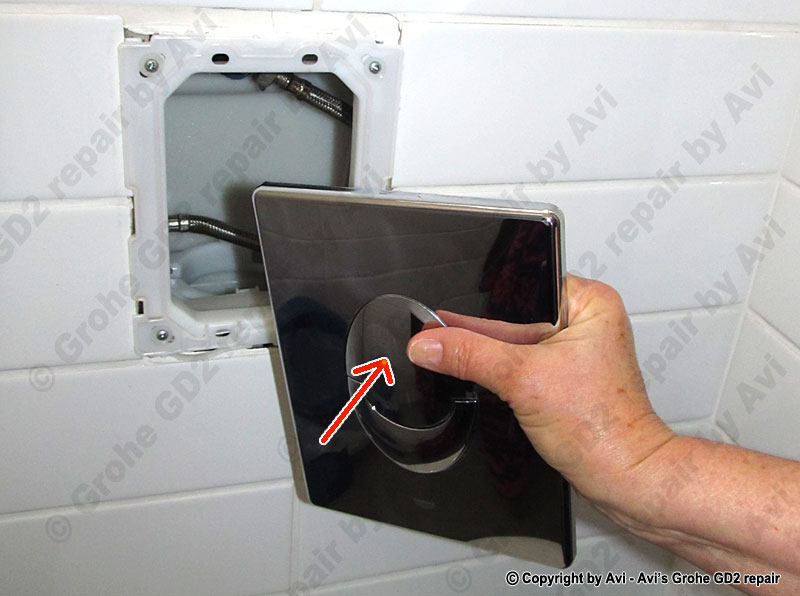
Grohe Actuation plate removal
Actuation plate removal
Push the lower part of the plate a bit up (1) and than rotate its upper part towards front (2) to release it and taking it off.
Tip: Take it off just a few centimeters as 2 air hoses are connected to it.
Grohe Water supply turn OFF
Water supply turn OFF
Use flat screwdriver and turn it CW
Grohe Discharge water
Discharge water

Grohe Air hoses disconnect
Air hoses disconnect
Place the actuation plate aside and keep its front plate from getting damaged / scratched.
Tip: Mark the actuation plate so you’ll know which hose connects to each button connector. Note that though this plate consists of several detachable parts that can easily be replaced, Grohe does not sell any of it. You’ll be offered to replace the full subassembly panel which costs a lot. Grohe unfortunately does not care about the environment and sustainability matters when it comes to its own parts.
Just in case you got those parts, here are some disassembly images that might help.

a. Press 4x snaps aside to detach the buttons from the plate
a. Press 4x snaps aside to…

b. This is the detached parts. Each button is held by 3 Black snaps.
b. This is the detached parts…

Grohe Small button parts
c. Small button parts

Grohe Large button parts
d. Large button parts

Grohe Frame removal
Frame removal

Grohe Water supply hose disconnect
Water supply hose disconnect
Turn ring CCW by hand. Move the hose end to the side of the cistern.
Grohe Water float valve disconnect
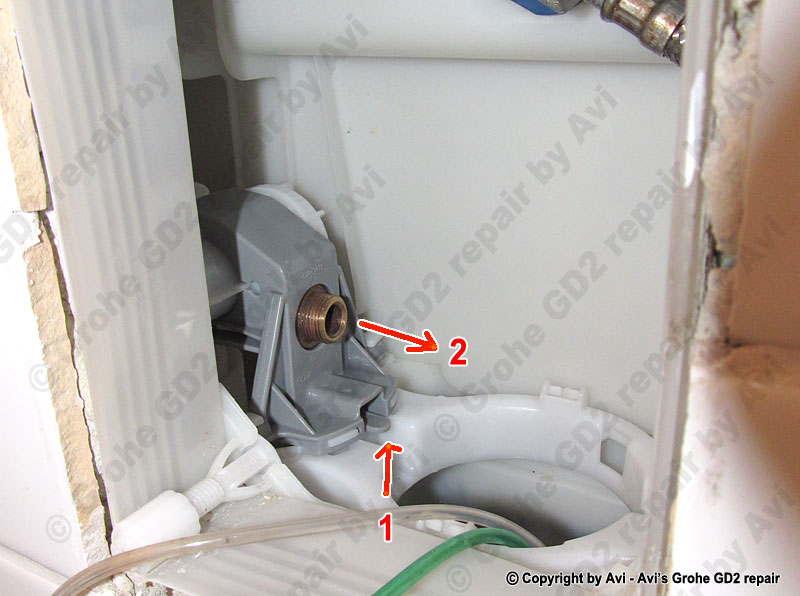
Water float valve disconnect
First push the latch up (1) and while holding the latch, slide the float valve towards the center (2).
Do it while turning it along with pulling it out.

Grohe Remove the float valve step a
a. Pull and rotate

Grohe Remove the float valve step b
b. Continue to pull and rotate

Grohe Remove the float valve step c
c. Continue to pull and rotate until removed
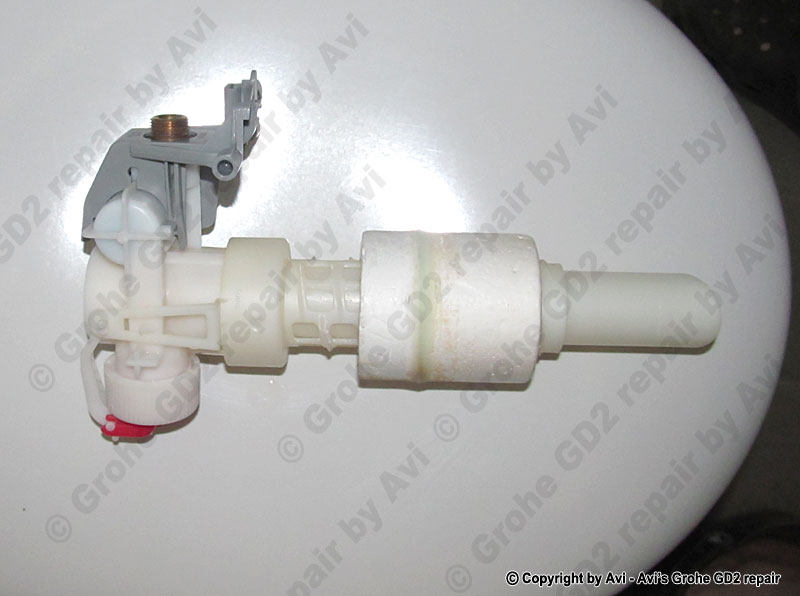
Grohe Remove the float valve step d
d. This is the float valve outside the cistern

a. Squeeze snap (1), pull tab (2) remove the float (3)
a. Squeeze snap (1)…

Grohe Further disassembly step b
b. Unscrew spring cap
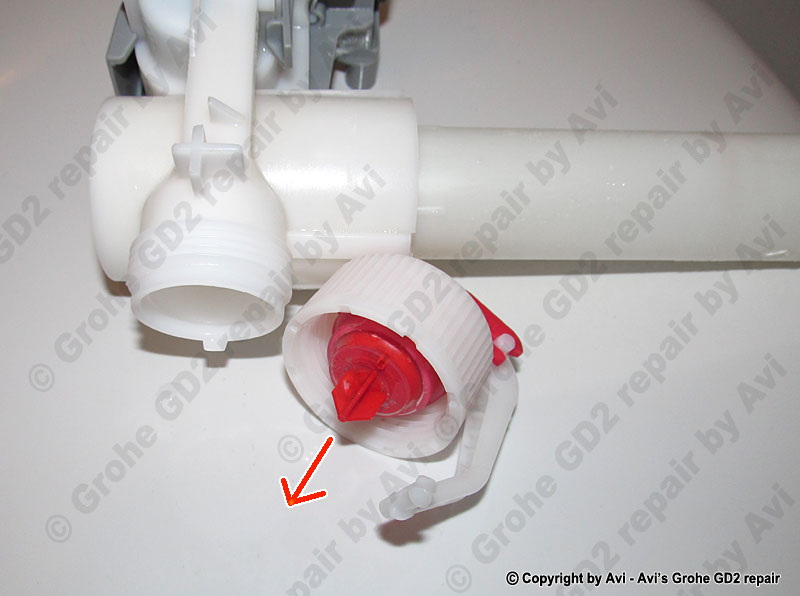
Grohe Further disassembly step c
c. Remove cap

d. Remove inner (red) part with membrane (pull out)
d. Remove inner (red) part…

Grohe Further disassembly step e
e. Unscrew second cap

Grohe Further disassembly step f
f. Remove cap and clean inner and o-ring sides
First squeeze both latches (1) and than pull the frame upwards (2).

Grohe Remove stabilising frame step a
a. Release and pull frame

Grohe Remove stabilising frame step b
b. Remove frame
Separate it to 3 parts while inside the cistern.

a. Turn blue cap CCW (1) and remove it (2) Let inner seal rod drop down into the container. (3)
a. Turn blue cap CCW (1) and…

Grohe Remove discharge valve step b
b. Remove the pneumatic sub-assembly

Grohe Remove discharge valve step c
c. Remove the seal rod

d. This is the pneumatic discharge valve Image shows it assembled, outside the cistern
d. This is the pneumatic discharge valve…
Note: Correct orientation of the Blue cap in image 10.d. should be turned by 180 degrees, as seen in image 10.a.
a. Parts of the pneumatic valve: Cap (1), Pneumatic sub-assembly (2) and Seal rod (3)
a. Parts of the pneumatic valve:…

b. Release 3x snaps holding the pneumatic cap. Pull cap out
b. Release 3x snaps holding the pneumatic…

Grohe Further disassembly step c
c. This image shows the cap removed

Grohe Further disassembly step d
d. Remove inner cylinder, pay attention to its slides

e. Rotating handle of the inner cylinder Make sure handle moves freely
e. Rotating handle of the..

f. This pin moves by small button air push Blow air through the hose to test it moves freely
f. This pin moves by small button…

g. This small cylinder moves by large button air push Blow air through the hose to test it moves freely
g. This small cylinder moves by large…

h. When assembling, pay attention that this latch goes under the snap
h. When assembling,..

To replace the seal, press the 3x snaps, release and pull the outer ring out.
To replace the seal,…
11. Seal gasket.
Located at the end of the rod.
If Silicone seal needs to be replaced, this is where you’ll find it.
12. Tip: Clean the cistern container.
If you have got that far, it is advised to clean the bottom of the cistern container. Insert your hand into the container and pick any stones, sand etc. found in its bottom. You can turn on water supply and use running water to move and flush any debris found in the container bottom.
Since water goes from the container to the toilet, it is best to take out any large particles by hand to avoid jamming of the toilet water diffuser holes.
Assembling steps:
- Insert the seal rod to the cistern. (seal facing down)
- Insert the pneumatic subassembly to the cistern and insert the rod inside it using its slides.
- Place the Blue cap on top of the rod (6L in front), turn it CW and lock it.
- Place the pneumatic discharge valve inside the center pipe, rotate it CCW until it drops down into place and lock.
- Insert the stabilising frame. Make sure it is locked into its place.
- Insert the float valve while rotating it.
- Connect the float valve to the stabilising frame. Make sure you hear the click when it is locked.
- Connect the water supply hose.
- Install the plate frame.
- Turn on water supply. Turn screw CCW. Make sure it does not leak.
- Connect the 2x air hoses to the actuation plate. Make sure hoses are not bent and its path is clear.
- Install the actuation plate to the frame
- Test each button.
Tip: In order to keep the shiny chrome coating of the actuation plate and buttons for years to come, DON’T use any toilet cleaner or any other aggressive cleaning material. Use only a soft paper towel with some window cleaner that contains Alcohol to clean and disinfect it.
Tip: Clean the cistern periodically.
Once a year or every several years depends on the water hardness level in your area.
In many places the water is hard and scale will build up on the cistern parts which eventually will cause it to malfunction.
Tip: A common fault is water overflow. The water supply does not stop when the cistern is full. The cistern is still functioning but the water supply keeps flowing into it. Because of an overflow safety design, the excess water flows to the toilet. The reason for this fault is that the clogged float can not move freely and the valve that controls the water supply will not cut off.
To solve and fix this fault, disassemble the parts as described above. Soak the parts for several hours in a water with citric salt solution. Use also a soft brush to remove any stubborn hard scale. Brush all parts and make sure that the gasket seal and its area (see part 11. above) is sooth and scale free. Pay close attention to the membrane (see part 8.1 d above) and make sure it is not damaged and that it is assembled correctly. This small gasket is responsible for cutting off the water supply when the float goes up.
When done, rinse all parts and reassemble it.
Enjoy, Avi Schneor 
* For Hebrew intro, follow to this link
Comments, remarks and updates are welcome.
Some will be published, with hidden sender’s details.
Did you find this article helpful?
Did it save you time and trouble?
If yes, please consider donating some $$$ to help me cover the hosting cost involved. Thanks
To make a donation, please click the following PayPal button:

Copyright © Schneor Design. All rights reserved. Do not copy without written consent from the author.
Thanks for the guide. Just wanted to ask a question before I start putting everything apart. If one of the buttons is bearly flushing at all and the big one is but not as much as it used to, what part do you think needs replacing? The plate looks function well as I took it apart and when pressed air comes out from both buttons. Thanks.
Hello
“when pressed air comes out from both buttons” does not mean that air pressure is correct.
First check that the hoses are not bent while the plate is in place.
Try to blow strongly directly into the hoses, if it flushes OK it means that the buttons are faulty and needs to be replaced. If it doesn’t flush, the problem is in the flushing mechanism.
Good luck
Thanks for a great story! One thing… Can you add some info or send a link for adjusting the water flush amount for each button please? No idea how to do it at home. Wasting water makes me sad. Thank you!
This model has NO adjustment for the water amount. It is either 3 or 6 Lit depends on the button.
And BTW, I do not refer my guide as a “story” ☺, it is a guide, a technical DIY guide.
Have fun
הי,
תודה על העזרה.
אני אשמח לדעת איפה אני יכול לקנות את החלק בתוך הלחצן, המשאבה מגומי בצורת צינור? אני חושב שקראת לו Bellows.
תודה רבה.
כפי שרשום במדריך, למיטב ידיעתי לא ניתן לרכוש חלקים פנימיים של גרוהה ללוח הלחצנים, בעיקר לא את המפוח. יש באתרי מכירות חלקים דומים אך קשה מאוד לדעת בדיוק לאיזה דגם הם מתאימים
בהצלחה
Your instructions are great. I am having a problem. In step 6, I twisted the ring to disconnect the water supply. The ring is now loose, but the water supply hose still seems stuck on. Do I need to do something to disconnect it from the rest of the assembly?
Thanks.
Make sure the ring is totally loose and pull it with small shaking movement while holding the base part.
this should disconnect it.
Hi great instructions
My toilet is very slow to fill
Please can you tell me which part increase the fill rate
Thanks you
Thank you
First check the water supply pipe that goes to the cistern,
if it is OK, try the water valve that controls the water supply flow, try to open it more.
See part 2. in my post
Good luck
אבי בוקר טוב
אתמול כאשר ניסיתי להוריד מים ולא ירדו אז פתחתי ונגעתי בצינור השקוף וזה הסתדר, היום גם זה לא היכן אבקש את עזרתך בזיהוי התקלה.
מיכה ז.
מבלי לראות את ההתקנה ולפי מה שאתה מתאר, כדאי קודם כל כדאי לנתק את צינור האויר, לסדרו ולחברו שוב כך שכשאתה סוגר את מכסה הלחצנים לא יווצר כל קיפול בצינור.
אפשרות נוספת, לנתק את צינור האויר, לקצרו בכמה מילימטרים ולחברו שוב למכסה הלחצנים
בהצלחה
רציתי לשאול מה ניתן לעשות כאשר הלחצן כאילו עובד באויר.
אסלה סמויה גרואה 2 צינוריות
2 לחצנים.
האם נראה לך שצריך להחליף מנגנון?
האם אתה מטפל ומתקן?
תודה לך מראש על כל תשובה.
שלום מאיר,
אינני מתקן ואינני מוכר דבר.
אם אתה זקוק לחלקים פנה לסוכן של גרואה או לחנויות אינסטלציה.
תמיד קח אתך את החלק התקול כדי לוודא שאתה רוכש בדיוק את אותו הדגם.
לעצם שאלתך אנסה לעזור.
הייתי מתחיל בלהסיר את מכסה הלחצנים ומוודא שהצינורות מחוברים ללחצנים ולאורך כל הדרך למנגנון הם אינם מקופלים.
אם זה כך, נתק את הצינור הבעייתי ונשוף דרכו בחוזקה, אם המים יורדים סימן שהמנגנון תקין. אם לא, יש בעיה במנגנון.
החזר את הצינור ללוח הלחצנים ולחץ על הכפתור, אם המים יורדים הכל בסדר ואם לא, סימן שהלחצן עצמו תקול.
במקרה שכזה יש להחליף את לוח הלחצנים. למיטב ידיעתי לא ניתן להשיג חלק חליפי ללחצן בודד.
בהצלחה
One of the best DIY guide I’ve come across. Thanks a lot. BTW how does one fix the maximum water level. Which part controls that a photo would help. Thanks in advance
Thank you Venkat,
Per Grohe website “adjustment ex factory 6l and 3l” so it seems there is no level adjustment for this model.