Rancilio Silvia Mega-Mod part 3 Pressure gauge

Index of Silvia Mega-Mod posts:
Introduction | Disassembly | Pressure Gauge | Brew+Steam Control | Brew Timer | Pre-Infusion
Water Level | Light | Boiler Insulation | Grouphead Shower | Drip Tray | Pump Drain
Power Timer | Insulated Steam Wand | Acknowledgments
Buy Silvia Mega-Mod eBook
Avi's Silvia Mega-Mod
My way to a better coffee...
DISCLAIMER - Important!

Silvia V3 has an OPV (Over Pressure Valve) that controls pressure.
It is not meant for daily use, only for calibration in case it is out of normal. Pressure reading helps to understand if pressure is correct for brewing. If you find your Silvia pressure is anything but 9 Bar, you can adjust the OPV to correct.
On a daily base, the pressure gauge serves mainly as an indicator that tells you if everything is OK.
 Tip: For the way to adjust the OPV, follow Fig. 5 on page 8 and section 8.7 on page 35 of Silvia manual.
Tip: If you don’t have a gauge and want to measure your Silvia pressure, you can do it easily (though not accurately) by measuring the flow rate from the OPV pipe while using a blind basket.
In 1 minute of brewing operation (with blind basket) you should get 320cc of water if pressure is set to 9 Bar.
(you can measure it for 30 sec. and double the result)
This technique is based on Ulka pump’s specification graph which draws the typical flow rate vs. pressure.
Some sites suggest only 260cc based on the medium graph which I believe is a mistake.
I made the flow test after I completed the pressure gauge mod and when gauge showed 9 Bar, I got 320cc which is the value when looking at the Max. graph.

Some mods suggest it should be before the OPV, right after the pump exit or in the pump-OPV line.
Some mods suggest it should be after the OPV, to the boiler cold water inlet or along the steam pipe and some suggest it should be connected to the brew head.
So connecting the gauge to points 1, 2, 3, 4 or 5 should result the same. But measurements done by others suggested it is not consistent and that there are differences between readings depends on location.
In the steam mode, water in the boiler turn into steam and gets hotter in the top of the boiler, it is reasonable than that locating the gauge outlet in the steam path would give more precise and quicker response readings, especially when steaming.
In heat mode and standby mode, hot water flow to the upper part of the boiler, so measuring pressure in the upper position seems more accurate to me. Perhaps the most accurate location of all is inside the brew head. This measures the pressure closer to the coffee puck, but this installation requires the manufacturing of a custom adapter that I didn’t want to go into.
Connecting the gauge to the steam pipe means cutting Silvia’s steam pipe and shortening it and is more complicated than just connecting it to the pump for example. Nevertheless, I have decided to go with this location.
To start with this mod, you need the following:
A. A gauge that is Glycerin filled. This helps to maintain steady reading without any special connecting pipe.
Range should be 0-16 bar or 0-20 Bar (0-300 PSI) etc.
Tip: Decide if you want the gauge internal or external and get one with appropriate inlet, rear or right angle one.
Tip: Find out if the gauge needs ventilation when assembled inside Silvia.
Tip: There are many diameter size gauges, get one that you find comfortable with.
I got big 2.5” diameter with a rear inlet for easy panel mounting.
B. Pay attention of the gauge connector thread. Try to get something standard like 1/8 or 1/4 NPT. This thread will determine the connector you’ll need in order to connect the gauge to a pipe and the pipe to Silvia in the location you decide.
C. Get necessary fittings, connectors, tee connectors etc. Save your time and go directly to Swagelok company that has all the parts you’ll need. Swagelok had designed a fantastic patented locking mechanism that helps getting perfect connections without leaks.
Tip: Download Swagelok full line catalog and search in it for your needs.
Tip: Silvia steam copper pipe is 1/4″ OD and pump’s line to boiler uses 1/8 thread.

1. B-400-3-4TTM Tee 1/4 (90 deg.) male NPT – 1/4 pipe OD – 1/4 pipe OD

Since I used a 1/8″ pipe to connect the 2 sides, I needed this adapter.
Using a 90 degrees fitting made it easier to control the pipe path inside Silvia.
Tip: Cutting copper pipe is done with a special pipe cutter to get a clean sharp cut.
Don’t even think of using any other tool for this job.
Tip: I have used Teflon tape on all threads prior of fastening.
Tip: Don’t forget to get a mounting bracket for your gauge to mount it easily on the panel.

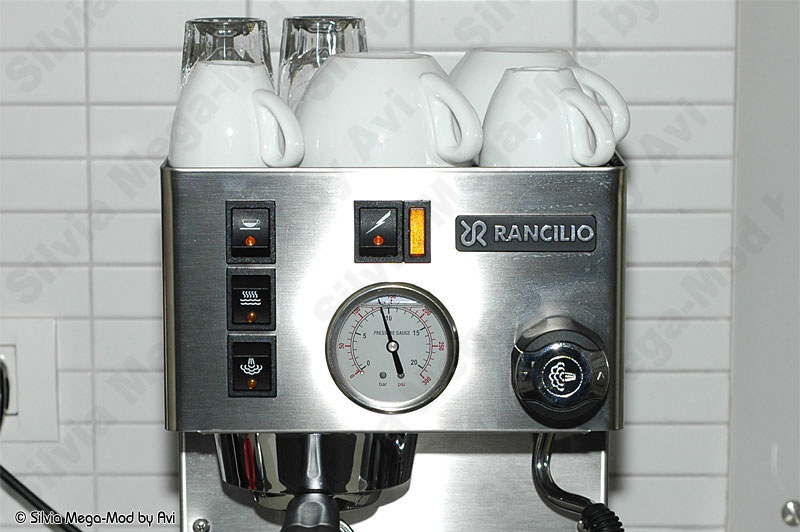
Avi’s Silvia Mega-Mod pressure-gauge front
Pressure-gauge before modding -front view

Avi’s Silvia Mega-Mod pressure-gauge rear
Pressure gauge before modding -rear view

Avi’s Silvia Mega-Mod pressure-gauge front cover
Pressure gauge -gauge on the front cover

Avi’s Silvia Mega-Mod pressure-gauge tee and elbow
Pressure gauge – tee and elbow on steam pipe

Avi’s Silvia Mega-Mod pressure-gauge inside
Pressure gauge – finished mod – inside view
Avi’s Silvia Mega-Mod pressure-gauge working mod
Pressure gauge – finished mod – outside view

Index of Silvia Mega-Mod posts:
Introduction | Disassembly | Pressure Gauge | Brew+Steam Control | Brew Timer | Pre-Infusion
Water Level | Light | Boiler Insulation | Grouphead Shower | Drip Tray | Pump Drain
Power Timer | Insulated Steam Wand | Acknowledgments
Buy Silvia Mega-Mod eBook
Comments, remarks and updates are welcome.
Some will be published, with hidden sender's details.
Did you find this article helpful?
Did it save you time and trouble?
If yes, please consider donating some $$$ to help me cover the hosting cost involved. Thanks
To make a donation, please click the following PayPal button:

Copyright © Schneor Design. All rights reserved. Do not copy without written consent from the author.
If you don’t have a gauge, how do you measure the amount of water with the blind basket on? wouldn’t you need the water to be flowing out of the group head?
Hello Owen
Please read carefully the 2nd tip of the pressure gauge page and look at the 1st image. All the answers are there.
If you use the blind basket method, the water flows trough the OPV pipe and this is what you measure.
Good luck
After you cut the steam pipe, do you have to re-thread the copper steam pipe before connecting it to the elbow and T joints?
No threads! Look at Swagelock parts, it has a special mechanism that takes care of the sealing.
Search for Swagelock drawings to better understand it.
tip: use a special pipe cutter to get a clean sharp cut of the pipe.
have fun
Great mod I am considering doing it to my Silvia, but i have couple of questions before that. I wonder why didn’t you continue with the 1/4″ pipe from the tee. Why did you use 1/8 an did 2 reductions one on the tee and one on the gauge? Will compression fitting work? Swagelock is difficult to order from.
Thanks Ivan
look at the pictures. The tee uses 1/4″ from the boiler to the steam valve.
1/8″ is used only to the gauge because this is the recommended diameter to use on gauges.
As for buying Swagelok, I’m sorry but I can’t help you with that. Try look for it on online shops.
Thanks